Making basic sourdough bread is shockingly simple. This is such an easy recipe that anyone can make delicious and fluffy homemade sourdough bread.
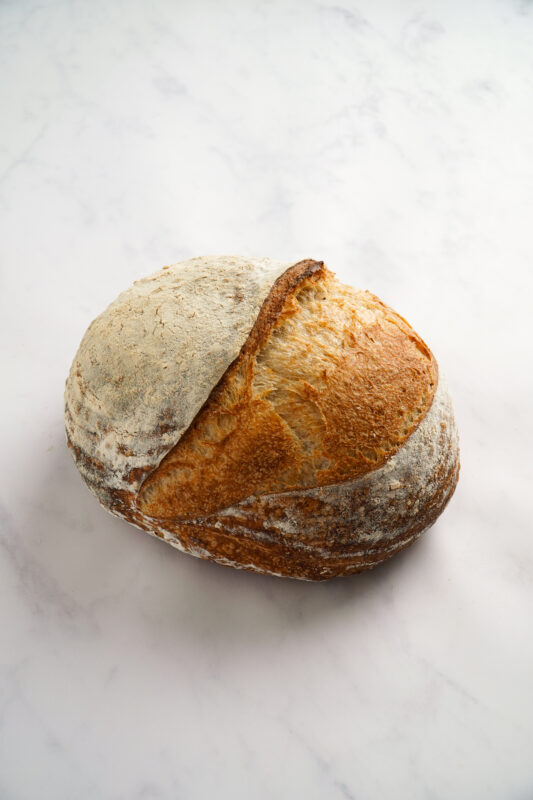
All you need is a few basic ingredients, some time, and patience, and you’ll have the perfect loaf of sourdough bread in no time. Get ready to enjoy the freshest, most flavorful bread you’ve ever tasted. So if you’re looking for a basic sourdough bread recipe that’s easy to follow, look no further!
Baking Sourdough Bread The Easy Way
It looks impressive, but baking sourdough bread is actually one of the easiest things you can do. Don’t believe me? Here’s a summary of the recipe – just look at how simple this is:
- Put up your starter 6-8 hours before you want to bake (you can manipulate the starter to go faster or slower in heat or cold temp)
- Mix flour, water, and starter.
- Wait 30 min then add the salt and knead the dough for 5-7 minutes
- Leave the dough to rise for 4-6 hours (depending on temp)
- Shape the dough
- Put it in a basket and refrigerate for up to 24 hours
- When ready to bake, preheat the oven.
- Score the bread and bake.
That’s it!! See? Anyone can do that!
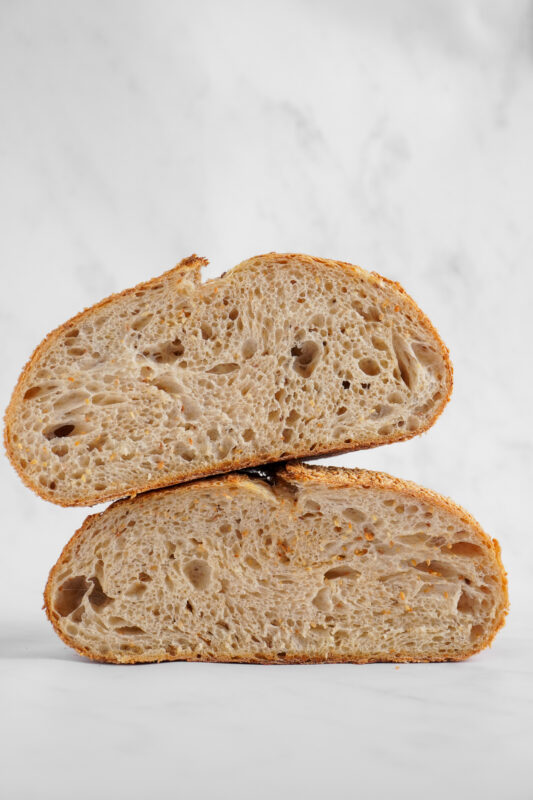
Sourdough Basics
If you’re here, you’re ready to grab a mixing bowl and make your first loaf! Congrats! (My favorite recipe is at the bottom of this post)
If you still have questions about what sourdough is and how to make a starter, then check out my free resources.
- Sourdough Guide
- Essential Tools
- How To Start A Starter
Making sourdough bread can be an intimidating task for beginners, but with the right recipe and some patience, anyone can make a delicious loaf of bread. The most important ingredient is the sourdough starter, which is used to give the bread its characteristic sour flavor. This starter needs to be fed regularly and cared for to ensure that it remains healthy. Once you have a healthy starter, you are ready to make your first loaf!
Babying The Bread Dough
Even with a simple recipe like mine, some people are still worried about how time-consuming it seems. They feel intimidated to start baking because they don’t want to “baby” the dough and be around to do stretch and fold every 30 minutes.
What if I tell you don’t have to do it?
As a matter of fact you can prepare the dough and forget about it for a few hours! I perfected a method that doesn’t require the stretch and fold.
Stretch and fold works on strengthening the gluten. What I do is knead the dough an extra 5-7 minutes when adding the salt which essentially does the same thing to the dough like stretch and fold. Voila! You just saved yourself 4 hours of sticking around.
Scoring Sourdough
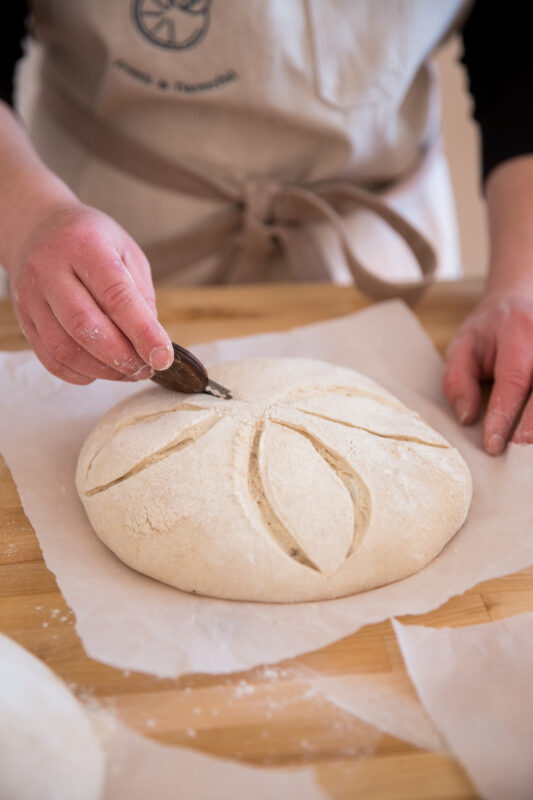
Scoring, or slashing, is a crucial step when baking sourdough, particularly at high temperatures.
The rapidly formed crust can cause the bread to crack and shape unpredictably if the loaf is not scored. Scoring creates weak points that let the expanding bread open uniformly and control the gas escape during baking, which maintains the bread’s shape and contributes to a well-risen loaf. This controlled expansion and the artistic touches scoring brings about make it an essential step for achieving beautifully shaped, aesthetically pleasing sourdough bread.
Score While Dough Is Cold
It is easier to score the bread when the dough is cold. If you are fermenting the dough in the fridge then score right out of the fridge then place in oven right away (dont bring it to room temp). If you are leaving your dough out at room temp to rise then place in the freezer the last 15 min before baking. This will help firm up the dough.
Be Creative
You can make whatever design or pattern you like. Just keep in mind that the pattern will influence the loaf’s final shape.
A single, longitudinal score can cause the loaf to spring upwards, resulting in a tall, round bread, while multiple diagonal slashes tend to encourage sideways expansion, yielding a wider, flatter loaf.
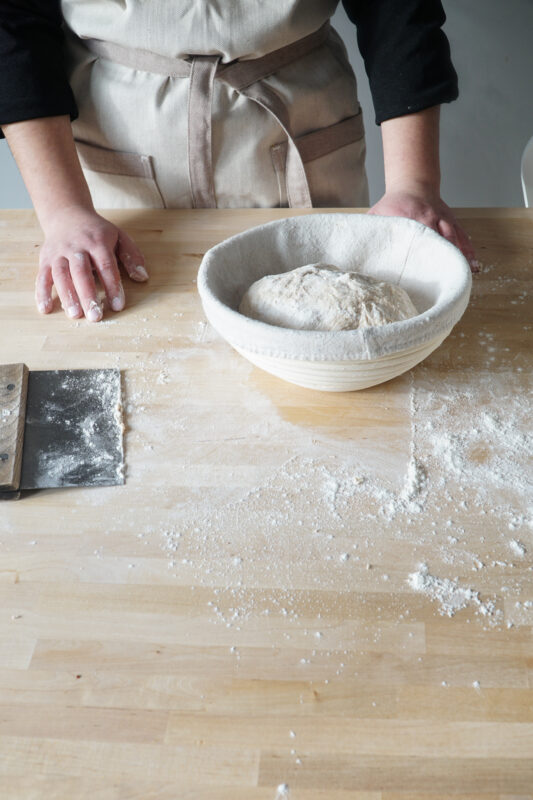
Why You’ll Love This Sourdough Recipe
I created an easy, no-fuss sourdough recipe for beginners because I was just like you. I know the frustration of failed starters. And the sheer exaltation of a successful, fluffy, sourdough loaf, hot out of the oven.
When I first heard of sourdough bread over a decade ago, I was intrigued by the idea of making a unique and flavorful healthy bread from scratch. Little did I know, I was in for a learning curve, resources were limited and there was not much information available. It took a lot of trial and error, but I eventually mastered the technique and created a simple sourdough bread recipe that produces a crusty, flavorful loaf. Since 2014 I have been teaching my methods and recipes to thousands of people.
With this simple method you can easily make a delicious and crusty sourdough bread with every batch. After mastering the basics, you can experiment with different flours and techniques to customize your bread.
This Is Just The Beginning
I can confidently say that anyone can make delicious, crusty sourdough bread following my simple recipe. With patience and practice, you too can become a master baker!
Of course, after you get started (pun intended, lol) you can progress to some of the many recipes with sourdough featured here. Imagine Apple n’ Honey bread Sourdough donuts will be sure to impress everyone at your holiday parties. Sourdough cinnamon buns. Having a barbecue? Make some sourdough hamburger buns! I’m sure your kids will love them with all the fixings, I know mine do. A Barbeque is one of those all-time favorite meals in my house that wouldn’t be complete without these soft and delicious rolls.
Need More Help?
Still scared? Don’t be, I’m right here to the rescue. Just sign up for my classes or order my Bread Basket Course+ kit bundle. I know you’ll be hooked just like I was and soon be on your way to wowing everyone, most importantly-yourself
You will be so proud of yourself after you accomplish making this scrumptious Country loaf that you’ll want to make it for all of your friends and family. After creating this masterpiece, try some of my yummy recipes with sourdough bread (link to internal recipes).
Making a basic sourdough bread requires only a few ingredients: bread flour, whole wheat flour, water, and a sourdough starter. With this basic sourdough bread recipe, you will be able to confidently make your first delicious loaf!
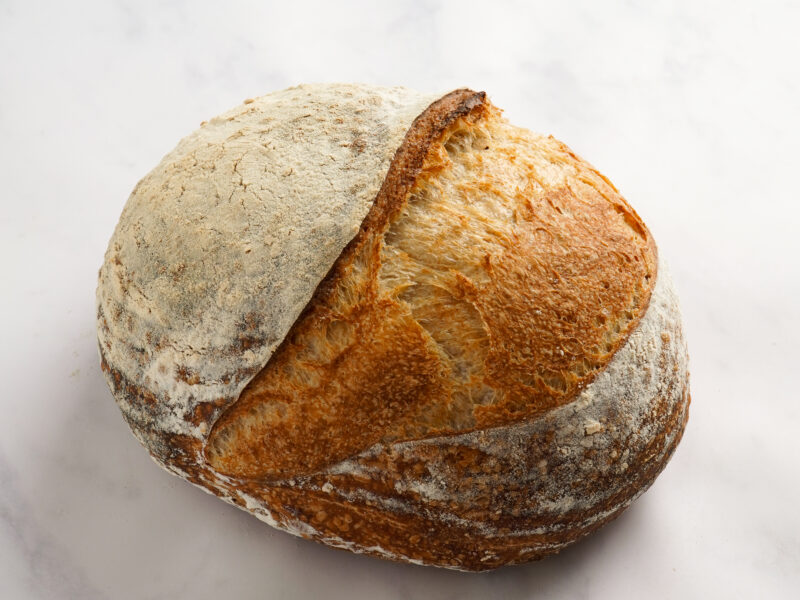
Basic Sourdough Country Loaf Recipe
Servings
Equipment
- Large Bowl
- Towel
- Dutch Oven
- Wire Rack
Ingredients
- 100 grams Active Sourdough Starter bubbly sourdough starter
- 450 grams White Wheat Bread Flour
- 50 grams Whole Wheat Flour
- 375 grams Water (room temp or lukewarm if the ambient temp is cold.)
- 10 grams Salt
Instructions
Preparing the dough
- In a large bowl, combine the active sourdough starter and water, leaving behind 25g of water for later use.
- Add the whole wheat flour and white wheat bread flour to the bowl.
- Mix the ingredients well until a rough dough forms. It's okay if the dough is sticky at this point.
Autolyse
- Cover the bowl and leave to rest for 30-60 minutes.
- After 30-60 min of rest add 25 g of water and 10g salt, and knead until salt and water is combined into dough.
Bulk Rise (a.k.a. ‘bulk ferment’)
- Cover and set the bowl in a warm area (75-80 degrees) for 3 to 4 hours or for 6-8 hours in a cooler place.
- During this time, perform a stretch and fold every 30-40 minutes*.
Bench Rest
- Scoop the dough onto the countertop.
- Lightly flour the top of the dough. Very gently turn over the dough so the floured side is face down, and fold the dough on all 4 ends, gently shape into a round boule.
- Leave the dough to rest for 20 minutes. The edges should be round and thick (it's ok if it flattens a little) but they should not taper off. If they taper or flatten off, reshape and let sit for another 20 minutes (this is like doing another set of folds during the bulk rise).
Shaping
- Sprinkle a lined bowl or banneton with flour.
- Fold bottom third up, right side third over, left side third over, top third over and then roll the entire loaf over and gently pull toward you, letting tension form the loaf. Place in a prepared bowl.
- Once the dough is shaped you can let it rise for 3 to 4 hours at room temp or place in the refrigerator for up to 12 hours (known as ‘retard’).
Baking
- Place your Dutch oven in the oven and preheat the oven to 500°F
- Place a sheet of parchment paper over the work surface or kitchen counter. Gently invert bread from the bowl onto parchment paper.
- When fermenting your sourdough in the fridge, you can score and bake it right out of the fridge – no need to bring it to room temperature before scoring.
- Score the top of the bread.
- Bake at 500°F, covered, for 20 minutes.
- Remove lid, lower temperature to 450° and continue to bake for an additional 20 – 30 minutes until crust is a rich dark amber color.
- Let it cool on a wire rack.


 Sourdough Starter: A Comprehensive Guide to Caring and Maintaining an Active Starter
Best recipe!
Use it for a couple of years now
Always a win
Thank you so much Chaya! I am happy to hear your family loves this as much as we do!:)
Thanks so much!!! In your article explaining feeding your starter i was confused by feeding it “starter, flour and water “. Dont you just feed it flour and water? Im confused :))
You always need to have a little of your old starter in the jar to feed it, so you need starter, flour and water….
in the article about feeding your starter, you said that if the recipe calls for 100 grams starter, take 1-2 tablespoons starter and 50 grams flour and 50 grams water. does that mean i cant just take from my jar 100 grams (your dried starter says to only feed it 40…)?
Hi Sara,
In order to be able to use your starter for baking bread you need an active starter (bubbly) to achieve this you have to feed your starter at least 6-8 hours in advance.
To feed a starter you will use 1-2 Tbs of your existing starter and feed it 50g flour and 50g water which will equal to 100g total so when it is bubbly and active you will remove 100g for the recipe and be left with the 1-2Tbs which you can put away for next time..
The instructions on the dried starter is only to rehydrate and keep the starter alive.. When feeding 40g each you should always discard some… You will always use different amount to feed depending how much you need for the recipe.
I have been using your recipe for a couple months and i finally have heaven sourdough every shabbos! have you tried baking two loaves/pots at once? i’m afraid of breaking my oven rack. they’re so heavy! but it would save soo much time. one loaf is never enough!
Hi Rena,
I am so happy to hear you are enjoying the recipe and process of baking sourdough. I can’t agree more that one loaf is never enough 🙂 That being said I don’t recommend baking 2 loaves at once in 1 pot since it will turn into one big loaf, (unless if you have an extra large pot).
Can you leave your dough overnight in the fridge?
Yes, I believe the recipe gives you an option to leave it overnihgt before baking.
Hi Sara. Just joining the sourdough club!
When preparing to make multiple loaves, do I still start with 1-2 Tbs active starter and just multiply the feed to equal 100 grams per loaf? Or do I need to start with more active started in order to support multiple loaves?
Welcome to the sourdough club, I must warn you it can get addictive fast. 🙂 Depending how strong your starter is, if you have a very strong starter then 1-2 Tbs is more than enough to feed for 4 loaves.. otherwise you may need to feed it twice to build the starter..
Hi which company white wheat bread flour do you use? and if I don’t want to use whole wheat flour should I just substitute it for the exact amount of white wheat flour? The starter I have is with white wheat flour.
Hi Leora,
You can use any brand of white high-gluten or bread flour as long as it’s unbleached. If you want to substitute whole wheat flour with white bread flour, you can definitely do that. Just keep in mind that you may need to reduce the water by 10-15 grams to get the right dough consistency.
Can I use all purpose flour instead of bread flour?
Thank you so much for the starter guide.It came out amazing. now I’m up to the bread.I would like to use wwvor spelt flour.Does that come out the same?
Thank you, this has been extremely helpful.
When I put the dough on the counter to shape it, I put a piece of parchment paper and lightly floured it but the dough was extremely sticky. Is that normal? It was hard to shape and then it was hard to transfer to the lines bowl.
I’m so glad you found this helpful! When it comes to shaping the dough, it’s usually best to shape it directly on a clean counter. This creates friction to help tighten the gluten structure while shaping, making it easier to shape.
If the dough feels extremely sticky, a few things might be worth checking:
1-Gluten Development: The dough might need more kneading to build enough strength.
2-Fermentation Time: Over-proofed dough can become too slack and sticky. Make sure the dough hasn’t risen too long during bulk fermentation.
3-Starter Strength: If the starter wasn’t active and bubbly, it might not have been strong enough to support the dough.
what’s the best way to make a good pumpkin seed crust?
I took your course at the local JCC and have been enthralled with baking sourdough ever since. Often, we are just 2 for the Shabbos meals and I was wondering if I could use the basic recipe to bake smaller loaves or rolls? I would probably have to use the steam method as I don’t have small sized pots. Thanks so much!
I love hearing that you’re still baking! Yes, you can absolutely divide the dough before shaping and bake two smaller loaves. You can use the steam method or bake them together in a larger pot—both should work well. If you’re making rolls, just reduce temp to 375°F and bake time approx 35-45 min.
Happy baking, and let me know how it goes!
how do i make 3 small sourdough challahs out of recipe for one large- at what point do i divide the dough?
You can make 3 small challahs by dividing the dough after the bulk fermentation is done, right before shaping. Just split into 3 equal portions, shape each one, and then continue with your final proof as usual.
Will it work if I only have regular flour, and not high gluten?
Yes, it will still work with regular flour! The dough might be a bit softer and spread a little more since regular flour has less protein, but you’ll still get delicious bread. If you find the dough too soft, you can slightly lower the hydration (reduce the water by 10–15g) to help with handling.
What size Dutch oven do you usually use?
Welcome to the world of sourdough — warning: it does get addictive!
The Dutch oven just needs to be big enough to comfortably hold the dough and allow for oven spring. It’s not meant to hold the shape of the bread — that comes from proper shaping and proofing. Any Dutch oven around 5 quarts or larger works great!
Such a delicious fluffy and easy recipe.
Just started on the sourdough bandwagon and loving it!
If I do want to make rolls instead of a big loaf at what point should I separate the dough?
Thanks so much
I’ve been making this recipe as well as your multigrain spelt and beet recipes very successfully with great results. I would like to try and make them as rolls but not sure how to do that without mini dutch ovens. Do you have any instructions on baking sourdough rolls?
Love hearing that you’ve been baking all the recipes successfully — and yes, you can definitely make them as rolls!
After shaping, divide your dough into smaller portions (about 80–100g each) and shape into tight balls. Place the rolls on a parchment-lined sheet tray, leaving a bit of space between each one. Cover and let them proof as usual.
When ready to bake, preheat your oven to 450°F (232°C). Place the tray of rolls into the oven and add ice cubes to a lower tray for steam, just like you’ve been doing. Bake for 18–22 minutes, until golden and baked through.
I have been making sourdough for a while now. The dough is usually quite runny, even after the bulk ferment. When it bakes it becomes very flat. What can you recommend?
A dough that stays runny and spreads flat usually means one (or a few) of these things:
Weak starter: If your starter isn’t active enough, it won’t give the dough the strength and rise it needs. Make sure your starter is well-fed, bubbly, and doubling before you mix your dough.
Too much water: Try lowering your hydration slightly. Cut back around 10–15g of water in the dough.
Underdeveloped gluten: Make sure you’re kneading the dough well or doing enough stretch and folds during bulk to build strength.
Overproofing: If your bulk ferment goes too long, the gluten weakens and can’t hold shape. Try shortening your bulk ferment time.
Flour type: Some flours (especially lower protein ones) can’t handle high hydration as well. Using a strong bread flour with higher protein will help.
I’d start by lowering hydration and cutting back on the bulk fermentation time.
How do you make Garlic?
After adding the salt, gently fold in roasted or sautéed garlic cloves. Just be careful not to overload the dough — a little goes a long way and keeps the flavor balanced.